The first order of business was to make the game whole by filling the hole where the deflection board once was. Post a wanted ad I will. I figured the chances of finding a decent deflection board would be as likely and expensive as finding transport off Mos Eisley while avoiding any Imperial entanglements. Arcade karma was on my side though as a fellow collector that I had once tipped off about a $100 vector game in his neck of the solar system saw my wanted post and returned the favor. He had the deflection board I needed and a couple days later I had a complete ( but still non-working ) game. This was a known working deflection board ( I tested it in my Space Duel) so I set up the Star Wars monitor behind my Space Duel and used it as a test rig to see if the rest of the WG-K6100 was any good. For some reason the spot-killer LED came on when I put this deflection board in the Star Wars monitor. I changed out all the chassis transistors,metered them to make sure they were not grounded to the chassis yet I still had the same problem. I finally figured out that when the yoke was plugged in to the deflection board, one of the transistors would ground out to the chassis. After spending quite a bit of time going over and over this thing, I noticed that someone had inverted the red and yellow wires going to one of the chassis transistor sockets. After swapping them back to the correct positions, the spot killer was now off and I could hear deflection chatter. Finally a step in the right direction but still no picture on the screen. I re-capped the HV cage and soldered all the pins and still no picture. I was about to go back to the schematic when I heard the words of Obi-Wan in my head, " Use the brightness adjustment". I turned up the brightness and I had a beautiful color XY picture. The Force was strong with this one.
I now had a working monitor but the motherboard presented a whole new set of problems. I tested the motherboard using my own working Star Wars arcade game. There were matrix errors,a vram error, a non-volatile ram error,and a math ram error. Remember what I said about Star Wars arcade machines eliciting dread? I struggled to control my fears as I went about working on this motherboard. I replaced the flagged rams, reseated everything on the boards, cleaned the gold edges, and put the connector back on. I still was getting a math ram error, a bad vram, a non-volatile ram error, and the game would not save any changes to the option switches. The odds of the board having this many separate problems seemed odd and unlikely. The schematic showed that the LS138 at 2L could be the culprit of all of these problems. On a hunch I replaced it but still had the same problems. It was worth a try and the possibility that this board really did have 3 or more separate problems was becoming very real. I replaced the non-volatile ram at 1E and that fixed the option save issues. I swapped out the math ram at 5E and still showed a bad ram at 5E so now I know the issue was probably the socket. I replaced the socket and the matrix errors went away but still showed a bad ram at 5E. Using my meter and the schematics I started checking each pin from 5E to various places on the board until I found a dead trace. I soldered on a trace wire and now had a fully operational Star Wars motherboard. I really felt like hitting the cantina right about now but I still had work to do.
I put the monitor and motherboard back in the cabinet and powered on the game with my leads connected to check the +5 volts at the motherboard. With almost 6 volts at the motherboard I shut it down right away. Turned down the adjustment pot, started it up again and still had almost 6 volts. No wonder this motherboard had so many problems. I metered out all the resistors in the area of the AR-II board that could be the culprits and they all checked ok. I metered out the adjustment pot and it checked out ok. I decided to shotgun the rest of the AR-II with a rebuild kit and go from there. The rebuild kit worked and I now was able to adjust the +5 to you guessed it, +5 volts.
I replaced the marquee light and starter and got ready to play a game of Star Wars. Started up a game and noticed that the cursor on the screen was darting all over the place and the left thumb button didn't work. I replaced the thumb switch and the potentiometer and finally had a fully working Star Wars arcade game.
There was still work to be done. One of the rear corner joints had let go and the cabinet was a little on the shaky side. I removed all the old staples and screws, cleaned the area and glued it and screwed it back together. Now this machine really was ready for the jump to light speed. I delivered this game to the house of a fellow collector. Another Atari color vector gets another chance. It was a long process bringing this machine back and another great learning experience. A Star Wars arcade with monitor issues, motherboard issues, audio regulator issues, control issues, and cabinet issues has come back from the from the Dark Side. Never tell me the odds...
This yellow and red wire were backwards, hampering the jump to lightspeed:

This is not the chip I was looking for:

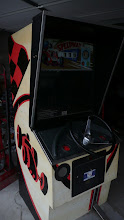
It was a little too cold out in the garage so the pinball room became a makeshift shop:

Whenever I put a cardboard shroud back in, I cover the staples with a piece of black electrical tape to protect the bezel :

You could almost fly a Star Destroyer through that gap :


Mini vise grips work great to remove old staples. Just tap the legs on the other side against the concrete a couple times till the head sticks out and then pull it through :

Wrapping a micro fiber rag around the blade of a screw driver makes it easy to clean the gap out:

I drilled pilot holes and then glued and screwed it back together. It may not be pretty, but even a wookie couldn't pull this apart now:

A pipe clamp holds it all in place while the glue sets:

For Yoda :

Special thanks to :
Ram Controls for the excellent replacement potentiometers.
Bob Roberts for the cap kits, various chips, and AR board rebuild kit.
Radio Shack for actually having the thumb micro switch.
Fellow Klov forum member Dylan aka "Tron Guy" for the deflection board.
My tech friend and true Jedi at fixing games Obi-Tom-Kanobi for the encouragement over the phone to stay the course.
The End.


No comments:
Post a Comment